Even the most impressive newly constructed building can sit empty and unusable without the right cleaning process behind it. Post-construction cleaning goes far beyond sweeping up a few stray nails or wiping down countertops. Fine silica dust, adhesive residue, drywall compound, metal shavings, and chemical fumes permeate every surface, HVAC duct, and corner of a newly built or renovated commercial space. Property managers and building owners who skip or rush this process risk health complaints, code violations, and costly callbacks long after tenants move in.
Table of Contents
- What makes post construction cleaning unique?
- Phase-by-phase cleaning: The industry standard process
- Tools, supplies, and timing: What you need before you start
- Workflow and methods: How to clean efficiently and safely
- Verification: Quality checks and turnover readiness
- Our perspective: The hidden ROI of professional post-construction cleaning
- Ready for a seamless move-in? Partner with regional experts
- Frequently asked questions
Key Takeaways
| Point | Details |
|---|---|
| Phased approach matters | Thorough cleaning is best achieved by following the industry-standard three-phase process. |
| Use the right equipment | HEPA vacuums and protective gear are crucial for safety and regulatory compliance. |
| Sequence prevents wasted effort | Cleaning from ceilings down avoids re-dusting and costly repetition. |
| Time your cleaning right | Waiting 24–48 hours post-build ensures dust has fully settled before cleaning. |
| Quality checks reduce issues | Final inspections and documentation help guarantee move-in ready results and prevent disputes. |
What makes post construction cleaning unique?
Before diving into step-by-step instructions, it's critical to understand why post-construction cleaning requires dedicated methods and planning.
Post-construction environments are genuinely hazardous in ways that ordinary office cleaning never encounters. You're dealing with sharp metal scraps, broken glass, concrete aggregate, and paint overspray. But the invisible threat is just as serious. Fine silica dust, released during cutting, drilling, and grinding of concrete and masonry, becomes airborne and stays suspended for hours. Unlike normal household dust, silica particles can cause serious respiratory disease with repeated exposure.
Standard commercial vacuums make this worse, not better. HEPA vacuums are required for environments with silica dust, where OSHA enforces a permissible exposure limit (PEL) of 50 micrograms per cubic meter over an 8-hour shift. A regular vacuum simply recirculates those particles back into the air. This is one of the sharpest commercial vs. residential cleaning differences that property managers encounter when overseeing a post-construction project for the first time.
Here's what you can expect the cleaning environment to include:
- Fine silica and drywall dust on every horizontal surface
- Construction adhesive, caulk smears, and paint splatter on floors and glass
- Debris in HVAC vents that will recirculate once the system turns on
- Sharp objects including nails, screws, and broken tile fragments
- Chemical residue from sealers, primers, and coatings
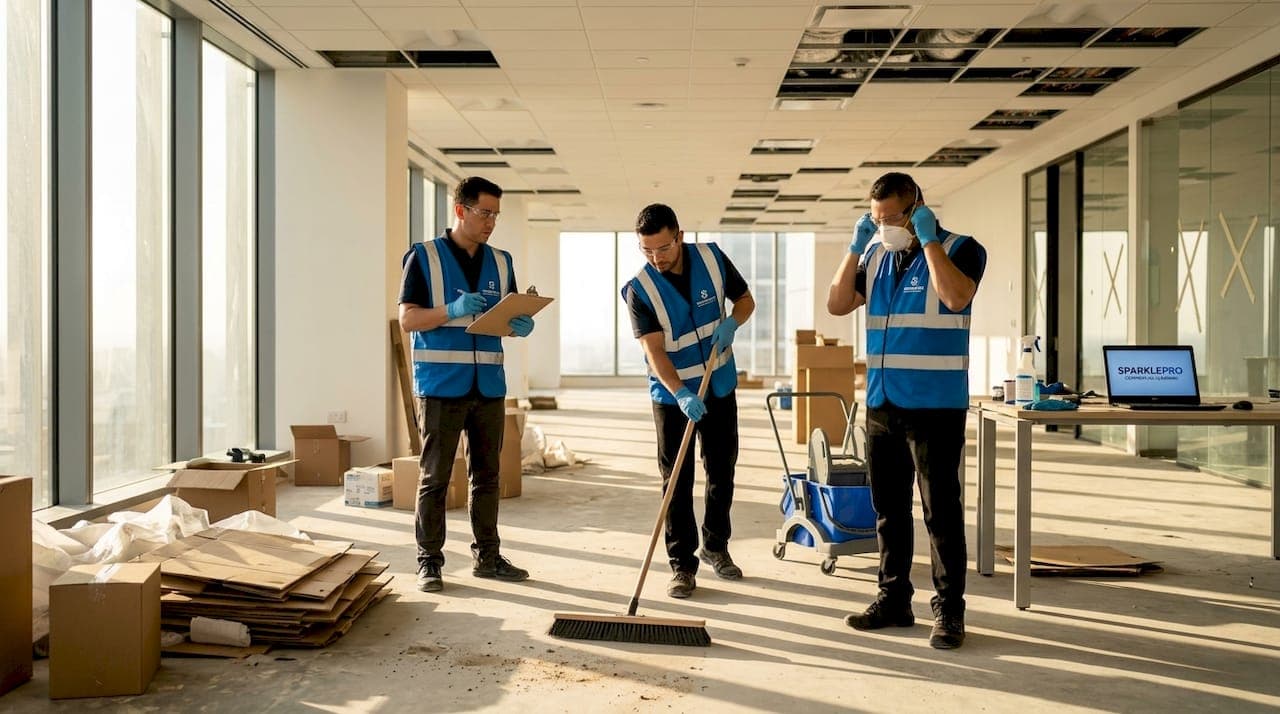
Compliance isn't optional. OSHA standards govern silica dust exposure, and what property managers must know about occupancy readiness extends well beyond visible cleanliness. Scheduling the right crew, with the right equipment, is how you protect both workers and future tenants.
Post-construction cleaning isn't maintenance cleaning done after a bigger mess. It's a specialized, safety-critical operation that requires trained personnel, compliant equipment, and a structured workflow. Treating it like routine janitorial service is one of the most expensive mistakes a property manager can make.
Phase-by-phase cleaning: The industry standard process
Understanding the hazards and expectations sets the stage for a systematic, reliable cleaning strategy. Let's break down the industry-standard three-phase approach.
The three-phase post-construction process is the backbone of every successful commercial cleanout. Phase 1 is the rough clean, Phase 2 is the detail or light clean, and Phase 3 is the final or touch-up clean. Skipping any phase doesn't save time. It typically doubles it, because earlier debris contaminates work done later.
Here's how each phase breaks down:
| Phase | Name | Primary Tasks | Key Tools |
|---|---|---|---|
| 1 | Rough clean | Remove trash, large debris, sweep floors | Heavy-duty bags, brooms, debris containers |
| 2 | Detail/Light clean | HEPA vacuum surfaces, wipe walls, clean windows | HEPA vacuums, microfiber cloths |
| 3 | Final/Touch-up clean | Polish fixtures, sanitize high-touch areas, inspect | Glass cleaner, sanitizer, inspection checklist |
Phase 1: Rough clean
This phase is about bulk removal. Every piece of trash, scrap lumber, packaging material, leftover caulk tubes, and construction waste gets removed from the site before any detail cleaning begins. Floors get an initial sweep. Windowsills and ledges get a quick wipe to remove the heaviest grit. The goal isn't perfection here. It's clearing the site so Phase 2 crews can work safely and efficiently without tripping hazards or contaminating detail-cleaning supplies with debris.
Phase 2: Detail/light clean
This is the most labor-intensive phase. HEPA vacuum equipment runs over every surface, from overhead light fixtures down to baseboards. Microfiber cloths pick up fine dust from walls, window frames, cabinet interiors, and door tracks. Window glass gets cleaned of paint overspray and adhesive film. This phase is where cleaning for contractors overlaps with compliance requirements, since HEPA filtration is mandatory for silica-exposed environments.

Phase 3: Final/touch-up clean
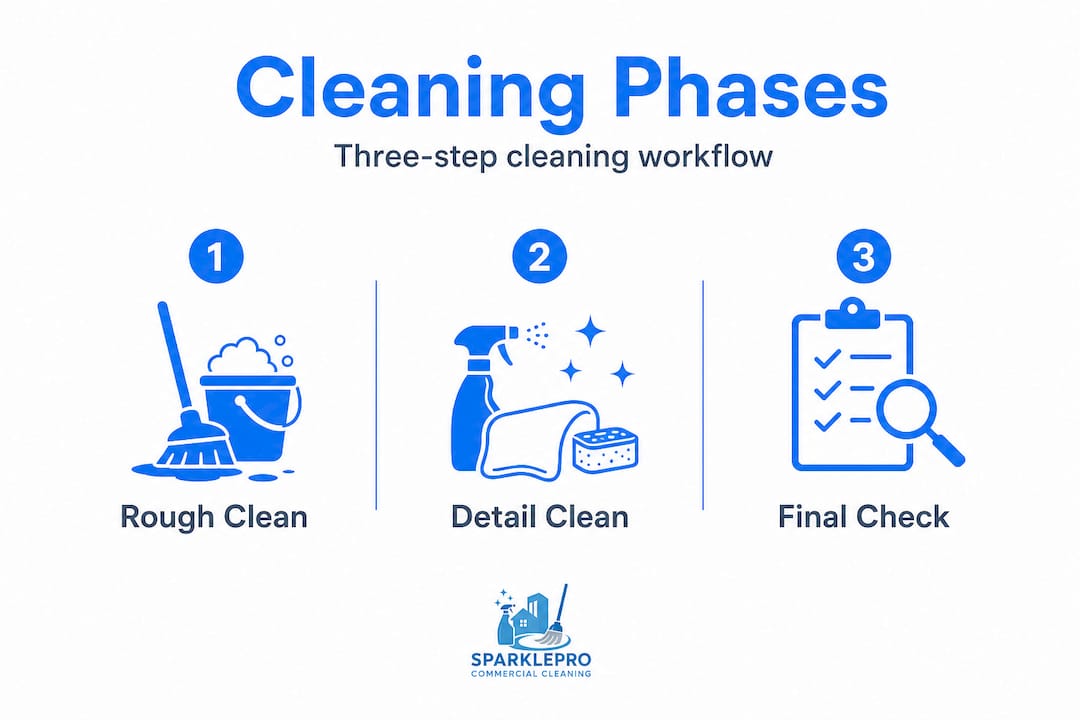
The final phase focuses on polish, sanitization, and confirmation. Fixtures get buffed. Restrooms get a full sanitary clean. High-touch surfaces, door handles, light switches, elevator buttons, get sanitized. A final walkthrough catches anything missed. The cleaning benefits at this stage go beyond aesthetics. A spotless, sanitized space signals professionalism to incoming tenants and accelerates lease execution.
Pro Tip: Never let Phase 3 begin until Phase 2 is fully signed off. Returning to detail clean after polishing fixtures wastes time and supplies, and risks scratching surfaces that are already prepped.
- Complete all rough debris removal before Phase 2 personnel arrive
- Run HEPA vacuums on ceilings, vents, and walls before touching floors
- Clean windows from inside out to identify which side still has smears
- Sanitize all restroom fixtures before the final walkthrough begins
- Photograph each area at the end of each phase for documentation
Tools, supplies, and timing: What you need before you start
With the cleaning phases clarified, success depends on starting with the right tools, materials, and a smart schedule.
The equipment list for post-construction cleaning is not interchangeable with standard janitorial supplies. Several items are non-negotiable from both a safety and an effectiveness standpoint.
Essential equipment and supplies:
- HEPA-filtered vacuums (required for silica dust compliance under OSHA's 50 μg/m³ PEL)
- Industrial microfiber mops and cloths in multiple grades
- Heavy-duty waste bags rated for construction debris
- Personal protective equipment (PPE): N95 masks or respirators, safety glasses, cut-resistant gloves
- Extension poles for ceiling fixtures and high windows
- Non-abrasive glass scrapers for paint and adhesive removal
- HVAC duct covers or filters to prevent recirculation during cleaning
Timing matters just as much as equipment. Industry practice is clear: wait 24 to 48 hours after construction wraps before beginning the detail clean phase. Dust continues to settle during that window. Starting too early means fine particles are still actively airborne, and your cleaned surfaces will be recoated within hours.
Statistic: OSHA's silica dust permissible exposure limit is 50 micrograms per cubic meter of air, averaged over an 8-hour workday. Exceeding this threshold creates liability for building owners and health risk for workers and future occupants.
Complex spaces require extra planning. High ceilings, multi-level staircases, and open atrium layouts increase both time and cost because equipment must be repositioned, ladders set and moved repeatedly, and high surfaces often require two-person teams for safety. Budget that time into your project schedule before scheduling tenant walkthroughs.
The commercial floor cleaning process for post-construction settings also differs from routine maintenance. Concrete subfloor sealer residue, adhesive from protective coverings, and grout haze all require specific removal techniques that standard mop-and-bucket setups simply can't handle. For harder challenges, deep cleaning solutions designed for commercial buildings can address compound buildup without damaging new flooring finishes.
| Tool | Standard cleaning | Post-construction cleaning |
|---|---|---|
| Vacuum | Standard filter | HEPA required |
| Mop | Microfiber or string | Industrial microfiber only |
| PPE | Optional | Mandatory (respirator, gloves, glasses) |
| Waste bags | Regular bags | Heavy-duty construction-rated |
| Window tools | Squeegee | Scraper plus squeegee |
Workflow and methods: How to clean efficiently and safely
Once well-equipped, the cleaning workflow ensures that efforts aren't wasted and hazards are minimized.
Sequence is everything. The ceiling-to-floor methodology is industry standard for a simple reason: gravity. Dust, debris, and cleaning residue fall downward. If you clean floors first, everything that falls from overhead surfaces lands right back on your clean floors. You end up doing the same work twice, and that doubles labor cost without improving results.
Here is the correct top-down working sequence:
- Overhead fixtures: Clean light fixtures, sprinkler heads, and ceiling vents using HEPA vacuum attachments
- HVAC vents and returns: Vacuum and wipe all grilles before the HVAC system is turned on
- Walls and vertical surfaces: Wipe or HEPA vacuum from top to bottom in consistent vertical passes
- Windows and glass partitions: Scrape adhesive film and paint before wiping with glass cleaner
- Cabinetry and built-ins: Interior shelves first, exterior faces second
- Counters and horizontal surfaces: Methodical left-to-right or grid pattern
- Baseboards and trim: Final wipe before floor work begins
- Floors: Last, using the appropriate method for the surface type
"Cleaning floors first causes re-dusting from overheads, doubling labor." Experienced commercial cleaning teams know this, but it's one of the most common and costly mistakes made by crews unfamiliar with post-construction environments.
HVAC systems deserve special attention early in the sequence. Construction dust that settles inside ductwork will recirculate the moment climate control activates. This contaminates every surface you've already cleaned. Cover HVAC supply registers during phases one and two. Clean duct grilles thoroughly before the system runs. For large commercial buildings, a full duct cleaning service may be warranted depending on how much construction activity took place near air handler units.
Pro Tip: Assign a dedicated crew member to inspect each zone after the main crew moves on. A fresh set of eyes consistently catches smudged glass, dusty corners behind doors, and missed debris under radiators or in window tracks that busy primary crew members walk right past.
Move-in cleaning for commercial properties requires this same systematic discipline. Whether you're handing a space to a new retail tenant or turning over an office floor to a corporate client, a structured workflow prevents the kind of missed spots that generate callbacks and delay certificate-of-occupancy sign-off. Reference the cleaning standards guide to align your team's efforts with recognized industry benchmarks.
Verification: Quality checks and turnover readiness
With efficient methods applied, the final touch is a rigorous quality check to ensure every area is up to standard before turnover.
A cleaning job is only as good as its verification. The final touch-up clean includes polishing fixtures, sanitizing high-touch areas, and a structured final inspection. That last step isn't a formality. It's your best defense against tenant disputes, delayed occupancy, and professional liability.
Use a room-by-room checklist during the final walkthrough:
- Fixtures and lighting: Dust-free, no smudges, all covers secure
- Windows and glass: No paint overspray, adhesive film, or streaks
- HVAC vents: Clean grilles, no visible dust accumulation
- Hard floors: No grout haze, adhesive residue, or scuff marks
- Carpeted areas (if applicable): Vacuumed, no debris or staining
- Restrooms: Fully sanitized, no grout haze on tile, mirrors streak-free
- High-touch surfaces: Door handles, light switches, outlet covers all sanitized
- Cabinetry interiors: No sawdust, no adhesive drips, no debris
| Area | Inspection criteria | Common defects to catch |
|---|---|---|
| Windows | Streak-free, no overspray | Paint film, adhesive residue |
| HVAC grilles | Clean, no dust accumulation | Dust rings, construction debris in duct |
| Restrooms | Sanitized, grout clean | Grout haze, mineral deposits |
| Floors | Surface-appropriate finish | Adhesive residue, grout haze |
| High-touch points | Sanitized, no smudges | Overlooked handles and plates |
Document everything. Photograph each room before and after your final walkthrough. This protects you from liability if a tenant later claims damage or incomplete work. Cleaning solutions for managers include documentation practices that hold up in professional and legal contexts. Organized records also make future post-construction projects easier to scope and price accurately.
Our perspective: The hidden ROI of professional post-construction cleaning
The industry tends to measure post-construction cleaning success by what you can see. Shiny floors. Clean windows. Spotless restrooms. But in our experience, the real return on investment is in what you can't see and what doesn't happen afterward.
When post-construction cleaning is done right, you don't get the callback two weeks later about grimy HVAC registers blowing dust onto new furniture. You don't get the tenant complaint about an allergic reaction triggered by silica particles that never got fully vacuumed. You don't get the property manager scrambling to re-clean a space the day before lease execution because the original crew skipped the Phase 2 sequence.
Rushed or improperly sequenced cleaning quietly accumulates costs. A space that looks clean at handover but has residual fine dust in ductwork, behind baseboards, or on interior cabinet faces will generate complaints within 30 to 60 days of occupancy. Those complaints damage your reputation with tenants, slow future lease negotiations, and create callbacks that cost more than the original cleaning contract.
Professional cleaning at this level is a real differentiator for property managers who manage multiple assets. A building handed over clean, documented, and compliant signals to tenants and investors alike that the property is managed with discipline. That perception drives faster lease-up rates, higher tenant satisfaction scores, and fewer disputes at the end of a tenancy. For guidance on keeping that reputation consistent over time, office cleaning tips for 2026 offer a practical ongoing framework.
The most expensive cleaning is the one you have to redo.
Ready for a seamless move-in? Partner with regional experts
If you're ready to eliminate risks and delays, it's time to leverage expert help tailored to your region.
Post-construction cleaning done at a professional level requires trained crews, compliant equipment, and a structured process that matches the scale and complexity of your property. Handling it with an undertrained team or rushed timeline introduces liability, delays occupancy, and can cost significantly more to fix after the fact.
Sparklepro Commercial Cleaning handles the full scope: rough clean through final inspection, HEPA-compliant equipment, documented verification, and crews that understand regional code requirements and commercial property standards. If your project is in the Northeast, Southeast, or Mid-Atlantic, we have experienced local teams ready to deliver. Connect with our commercial cleaning experts in Massachusetts, get specialized support from Delaware cleaning professionals, or schedule a site visit through our South Carolina commercial cleaning team. Request a quote today and get your property move-in ready without the guesswork.
Frequently asked questions
How long does post construction cleaning typically take?
Most commercial post-construction projects require one to three days depending on building size, with additional time budgeted for high ceilings or complex layouts like multi-level staircases.
Why should I wait before starting post-construction cleaning?
Waiting 24 to 48 hours allows airborne dust to fully settle so cleaned surfaces aren't immediately recoated, making the entire process more effective and efficient.
Is HEPA vacuuming really necessary?
Yes. OSHA requires HEPA vacuums for silica dust control, and standard vacuums recirculate hazardous particles back into the air rather than capturing them safely.
What's the most common mistake in post construction cleaning?
Cleaning floors first instead of last is the most costly error because dust and debris from overhead surfaces fall back onto clean floors, forcing the crew to repeat that work.
Should the HVAC system be cleaned after construction?
Absolutely. HVAC cleaning prevents recirculation of trapped construction dust throughout the building once climate control systems are activated, protecting both air quality and cleaned surfaces.